bing tracking image
  1. Electrical Tools
  2. Performance Tool
  3. Testers
  4. Multimeter
  5. Yellow
Digital Multimeter with 42" Long Test Leads - LED Display
Performance Tool

Digital Multimeter with 42" Long Test Leads - LED Display

Part Number: PT89ZR
In Stock
$21.92
Retail:$40.06
You Save: 45%
Electrical Tools
zoom in icon
slider vertical icon
zoom out icon
Comment field cannot be left empty.
Name field cannot be left empty.

Thank you! Your comment has been submitted successfully. You should be able to view your question/comment here within a few days.

Error submitting comment. Please try again momentarily.

Product Images

Need help with installation?
Locate installers near me
1-800-940-8924 to order Performance Tool electrical tools part number PT89ZR or order online at etrailer.com. Free expert support on all Performance Tool products. Great prices and Fastest Shipping for Digital Multimeter with 42" Long Test Leads - LED Display. Electrical Tools reviews from real customers.
  • All Info
  • Reviews (2)
  • Q & A (0)
  • Videos (1)
  • Photos

Performance Tool Electrical Tools - PT89ZR

  • Testers
  • Multimeter
  • Performance Tool
  • Yellow


  • Safely troubleshoot a variety of automotive, household, and shop electrical circuits
  • Test electrical components for faulty wiring and voltage
  • Verify voltage on engine sensors, ignition, fuel systems, and charging systems
  • Large digital LED display with UL-listed leads and probes
  • Test leads are 42" long

W2969 Performance Tool Digital Automotive Multimeter

Installation Details PT89ZR Installation instructions


California residents: click here


Video of Digital Multimeter with 42" Long Test Leads - LED Display

Videos are provided as a guide only. Refer to manufacturer installation instructions and specs for complete information.


Video Transcript for Ultimate Overview of the Digital Multimeter with 42" Long Test Leads

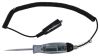
Ellen: Hey, everybody. I'm Ellen here at etrailer.com, and we're going to take a quick look at the Performance Tools digital multimeter. This is something that's really handy to have any time you're doing any kind of electrical job, or you're trying to test out any wiring, maybe do some troubleshooting with some wiring that's gone bad, you want to test out your battery, really anything along those lines. So a lot of times these are just something that's handy to have in your toolbox for any of those sort of instances.inaudible 00:00:25 about this is that it does give you a pretty big digital display that makes it easy to see what's going on. You get the leads that are about 42 inches long, so should be plenty of space, or plenty of length to get connected to whatever you want. And then there's also the included attachments that have a little alligator clamp, so that makes it easy, especially for testing out a battery without having to hold the little prongs over it the whole time.

So let's take a closer look and kind of run through some of those basic tests that you might end up doing.So here's our little guy, we've got a little kickstand at the back, makes it easy to just set this on a surface, set it on your trailer, on the floor, and we'll still be able to see what's going on. I'm going to hook up my leads here, they are color-coded so it makes it easy to remember what goes where. Got a couple little ends going over the prongs here. You'd probably end up losing these, honestly, but they do kind of help protect these. They are a little bit sharp, so if you've got these in a toolbox, it's kind of nice to have the caps just to keep them from ending up in your hand.There's also a couple of caps going over these ends, which I doubt you'll ever use, unless you're pretty meticulous about taking things apart and putting them away.

I'm just going to connect this up here. Most folks like to just keep the leads attached, makes it a little easier, so you're not having to take things apart every time. I'm going to put my alligator clamps over so we can test out our battery first. You don't have to, of course, you can just put the prongs over and it's not really too hard. You just want to make sure if you are going to use these, the inside there, this might be kind of hard to see, there's a little sleeve that that prong needs to fit into.

So just want to line that up to make sure it makes good contact all the way around.To turn this on, you just need to turn the dial away from the off position. So I'm going to turn it around to the 12 volt DC portion so I can test out my battery here. Swing those guys over and then set up my little kickstand there, and then just want to match the leads to my battery. We got red going to positive, black going a negative. And you can see our display showing what's going on there, so about 12 volts, that's what we should expect to get out of this.

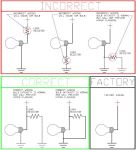
Now there is a hold button, it's going to be that yellow one kind of on the left-hand side, to freeze the display at whatever it's reading out. Sometimes on other multimeters, if you press that, it'll freeze it at whatever the highest rating is. But this, it's just going to freeze it at whatever it is at the time on the screen, so that's something to keep in mind.To reset it, just press it again. I've run into this, though. I'm not a huge fan of the way this functions on these multimeters, because if you don't have it connected, maybe you don't realize that you have the hold button pressed, so if you try to go and use it, it's still at zero, and it could be a little confusing. It might make you think that there's something wrong with the multimeter, but it's just that that hold is on. So as soon as we press it again, it's going to give us our true reading, but that's just something to keep in mind there.There is another multimeter available from Performance Tools that has a little bit bigger screen, and that at least does have a little indicator to let you know when the hold is on, which I kind of like, just so that you can, if something's going on and you don't realize the hold is active, it gives you a visual cue. But again, if something's going on wrong or you're just not getting a readout, or it's not changing, press that hold button and see what happens, and that should make it pretty easy.Another common way to use this is to test out wiring functions, so if you we're to plug this in and then you want to test what each port is to make sure you get things wired up, this would be another way to do that. So you'd have current going through, and then I think usually this guy is the ground, and then you'd want to run through all the functions and test out what goes where, so that's a pretty common way to do it. It does give you pretty long lead, so it makes it easy to fit that into any kind of wiring plug and get connected to make sure that you can test things out, do your troubleshooting and what have you.So all in all, this is a pretty standard multi-meter. As I mentioned, there are other couple available here at etrailer.com. I'd say this is kind of the middle of the road one we have. Here's continuity, it does give you an audible alert. So if you want to test a fuse or something like that to make sure that there's continuity, you can use that function. It does come with instructions so that you know what all those functions are and kind of give you the tutorial of how to use it. But all in all, this one is probably the nicest, just because it is still a digital display so that makes it easy to see what's going on. But it's also pretty compact, so if you want something just a little bit smaller than the other ones, this is a pretty good option. And it does still give you those alligator clamp attachments if you want to use those to make it a little bit easier to test out something like a battery.That's pretty much all there is to it for our quick look at this digital multimeter. I hope that this has been helpful in deciding if this is the right one for you. We do have a lot of other wiring, trailer and RV accessories available here at etrailer.com, so be sure to check them out. Thanks for watching.

Customer Satisfaction Score:

Ratings & Reviews

5.0

2 reviews

by:


by:


2
2

See what our Experts say about this Performance Tool Electrical Tools

  • How To Wire An Advent Air AC System To A Two-Wire Furnace
    Typically if there are two wires running from the furnace to the AC system then it means that the furnace has power already connected to it and it sends that through one of the wires up to the AC until the system calls for heat, at which point the relay will close and send power back to the furnace through the other wire. You'll want to connect the brown and white furnace wire from the controller # ACRG15 to the other wire send power back to the furnace. To determine which wire is which...
    view full answer...
  • Troubleshooting Only One Side of Trailer Brakes Locking Up
    Yes, when the electric signal is sent from the Tekonsha Prodigy P3 Trailer Brake Controller # 90195 to the trailer's brakes, it should cause both sides to lock up. Since only one side is locking up, it could indicate that one brake assembly needs to be manually adjusted. I attached a video that shows how to do this process. If that doesn't get it to respond then there is possibly an issue with the wiring going into the brake assembly which you can test using a circuit tester like # PTW2993....
    view full answer...
  • Troubleshooting EverChill 324-000119 12-Volt Refrigerator WD-282FWDC Not Cooling
    Since the lights and fan in your Everchill WD-282FWDC Refrigerator # 324-000119 work but the compressor does not appear to be performing its cooling duties I suspect you may have a power issue. The compressor will not operate unless it sees at least 10.5 volts input power. It requires 11-amps of current for normal operation. To determine if power is the issue you can check your batteries' actual voltage and current using a multi-meter like # PT89ZR. Also check that the wiring used to connect...
    view full answer...
    Image 1 for Image 2 for
  • Troubleshooting MaxxAir MaxxFan 12V Fan-Powered Trailer Roof Vent That Beeps
    My contact at MaxxAir advised that there are three potential causes for the beep and no fan motion you're experiencing with your MaxxFan Trailer Roof Vent # MA00-04000K. One potential cause is that the unit was wired with incorrect polarity. Make sure the white wire is grounded and the black wire is connected to your 12V power source (of at least 5-amps). Another possible reason for the malfunction is low incoming voltage. Use a voltmeter like # PT89ZR to make sure your battery is delivering...
    view full answer...
  • Troubleshooting Thomas Payne Recliner Power Issues Where Nothing Works
    Since your Thomas Payne Recliner has no power for any function, I recommend first plugging something into the outlet to make sure that isn't the issue. Next, I recommend checking the Cup Holder # 195-387597 and it's wiring connection because that selects the functions as a built in wired remote to the control box. Next check the connections to the control box # 195-387596 itself. Finally check the 12V power cord # 195-387595. There are no external fuses or circuit breakers that would...
    view full answer...
  • Load Resistors for 2018 Toyota Tundra and 2010 Airstream with LED Lights to Remove Error
    The load resistors # DI34ZR put out 6 ohms resistance each and you most definitely can install them yourself. I've attached a photo of the correct installation method to assist. They will get warm to the touch but you can absolutely install them on the inside of your RV where the wires come in from the tow vehicle. I wouldn't put anything right up against the fins as that would further reduce cooling and increase heat, but you won't have any issue in the location stated. The 7-Way...
    view full answer...
    Image 1 for
  • Troubleshooting an Everchill 12v RV Refrigerator Not Getting Cool Enough
    The most common issue for a 12v fridge like an Everchill RV Refrigerator w/ Freezer # 324-000119 having that sort of issue is a lack of power. You need at least 11.5v DC to properly work. You can use a voltage meter like the # PT89ZR to check the voltage running to the outlet and if you're getting less than 11.5v DC you'll need to increase the gauge of your wiring running from the battery to the outlet. If you have had the fridge for the past 3 years and are just now getting the issue,...
    view full answer...
  • Troubleshooting An Air Lift WirelessONE Compressor System That Won't Deflate
    There may be a couple of reasons why your Air Lift WirelessONE Compressor System for Air Helper Springs # AL25980 only builds pressure and won't deflate. One reason could be attributed to your vehicle's battery being too low. You'll want to ensure that your vehicle's battery is at least at 9 volts. You can use a multimeter like the Digital Multimeter with 42" Long Test Leads # PT89ZR. Another reason could be due to your vehicle's battery putting out too much voltage, i.e. 18 volts or...
    view full answer...
  • Recommended Replacement For An Inteli-Power PD9280 Converter Charger
    Yes, the Progressive Dynamics Inteli-Power RV Converter and Smart Battery Charger # PD9280A would be an exact replacement for your PD9280 converter. If you weren't just going to replace it and were going to troubleshoot the issue I recommend checking the output of the converter. It could be that the internal Charge Wizard is bad and not correctly reading the charge of your battery and thus sending more power than necessary to charge your battery. To test the output of the converter you'll...
    view full answer...
  • Troubleshooting Lack Of Signal With A Voyager WiSight 2.0 RV Camera System
    Hi Don, Typically if there is a signal issue with a camera system, like your Voyager # ASA84YR, it's a power issue. Most wireless camera systems are wired into the running light circuit or reverse light circuit. If it's wired to the running light circuit then you'll need to turn your running lights on in the tow vehicle. If it's wired to the reverse light circuit the camera will only come on when backing up. If that wasn't the issue then the next step would be to check the voltage running...
    view full answer...
  • Troubleshooting A Fogatti Tankless Water Heater That Won't Power On
    The Fogatti RV Tankless Water Heater # LSB64FR has a switch located inside the unit to the left of the exhaust vent. If this switch is off the unit will not operate. There's also a fuse right below it that you'll want to check before turning the unit on. If the fuse is fine and the switch is on and the unit still isn't powering on then you'll need to test the power wire at the unit with a multimeter # PT89ZR to see if maybe you're not getting a full 12v to the unit. If you're getting...
    view full answer...
    Image 1 for Image 2 for
  • Troubleshooting A Firestone Ride-Rite Air Spring Kit With Compressor Missing Error Codes
    Hi Chris, If your compressor is showing as missing then that tells me it's likely either a lack of power/was wired incorrectly or you have an air leak and the compressor was running for too long (4 minutes) and not building pressure. I recommend rechecking your wiring to make sure it's correct with no loose connections and then check the voltage at the compressor with a multimeter # PT89ZR to see if you're getting 12 volts. If not, then check your fuse and trace the power wire back to...
    view full answer...
  • How to Wire the GloLight LED Trailer Tail Light Part # STL178RB to a Trailer Connector
    The white wire on the back of the GloLight LED Trailer Tail Light part # STL178RB is for the ground. If you were wiring it to a trailer connector like part # HMC20031 then you would just need to make sure that it is attached to the ground terminal and no additional grounds would be needed. The outer ring of the light that you are referring to is made of plastic just like the body of the light is. The wire leads are around 6" long. I have attached a review video for you.
    view full answer...
    Image 1 for
  • Troubleshooting Furrion RV Tankless Water Heater Wall Controller Not Powering On
    You will want to check for power going into your Wall Controller # FR48NR by removing it from the wall and testing the wires with a Circuit Tester # PTW2992 that shows you battery voltage or by using a Multimeter # PT89ZR. Both wires will be blue and polarity doesn't matter you just need to identify if you are getting 12 volts of power to the controller and have a good ground. Be sure that the power switch on the outside portion of the water heater is switched on. If you have power at the...
    view full answer...
  • Troubleshooting A Voyager WiSight 2.0 Camera System That's Constantly Losing Signal
    Hi Lynda, The distance between the camera and monitor shouldn't be more than 60' for your setup so I would check the voltage getting to your camera. A weak signal is usually a sign that the running light circuit isn't providing enough voltage for the camera to operate. You'll need to remove the camera to get the to where the installer tied into the running light circuit with the camera and then test the voltage with a multimeter # PT89ZR. If you're seeing less than 12 volts you'll want...
    view full answer...
  • Troubleshooting A MaxxAir MaxxFan That Keeps Turning Off
    Your MaxxFan Plus Roof Vent w/ 12V Fan and Thermostat - Manual Lift - 10 Speed - White # MA00-04000K could be cutting off after 10 seconds for the following reasons: 1. Insufficient or fluctuating power. Your fan could be receiving less than 12v of power. Check the power wire at the unit using a multimeter like # PT89ZR. If you aren't receiving 12v then you could have a voltage drop off due to the length of the wire running from the battery to the fan and would just need to increase the...
    view full answer...
  • Troubleshooting Pilot Electronic Brake Controller Not Activating Trailer Brakes
    When the trailer is connected to your vehicle and the brake pedal or manual lever is not activated, the Pilot Electronic Brake Controller # 80550 should display a ".C" to indicate that the controller is reading the trailer. If your controller only ever shows the dot, the brake controller is not recognizing that the trailer is connected. The first thing I recommend checking is the trailer connector at the back of the vehicle and on the trailer. You will want to make sure that the connector...
    view full answer...
    Image 1 for
  • Trailer Brakes are Very Weak Even After Adjusting Them
    Since the trailer was off of the ground it would not take much voltage to stop the wheels from spinning so they may be getting power but they may not be getting enough power due to a short or wiring issue. But 9 times out of 10 weak trailer brakes indicate that the brakes need to be adjusted. Since you adjusted the brakes and that did not help it could be time to replace the shoes. If enough of the pads has worn away they will not be able to adjust out far enough to make good contact with...
    view full answer...
  • Replacing An Old Atwood Water Heater With A Fogatti Tankless Water Heater
    Hey Tashi, Your Fogatti wtare heater # LSB64FR is going to have a red wire to run to a 12v power source, black wire for your negative that you can just run to the frame with a ring terminal, and two blue wires that need to connect to the two blue wires on the remote. It doesn't matter which blue wire goes to which blue wire on the remote but they can never touch. As for the old wiring you'll need to test each wire with a multimeter # PT89ZR and see which is the power. The rest of the...
    view full answer...
    Image 1 for
  • Troubleshooting A "0" And "4" Error Code On A Fogatti Tankless Water Heater
    A "0" error code means that your outlet temperature probe is open or shorted and a "4" error code means that your inlet temperature probe is faulty and the inlet temperature probe is open or shorted. I recommend checking that your Fogatti RV Tankless Water Heater # LSB44FR is getting a full 12 volts of power at the unit with a multimeter # PT89ZR and that it has a proper ground connection. If both the power and ground are fine then you'll need to reach out to the manufacturer for replacement...
    view full answer...
    Image 1 for
  • Troubleshooting Lack Of Running Light Signal While Towing A Mini Cooper
    Hi Mike, If a specific signal isn't coming through to the towed vehicle or trailer then the first place to start would be the tow vehicle's trailer connector. It's super common for the trailer running light fuse to blow in the tow vehicle and not know. I would check the running light pin with either a multimeter # PT89ZR or circuit tester # PTW2993 to see if it's getting power. If not, then the fuse is likely blown. If you do have power then you'll just keep working your way forward...
    view full answer...
    Image 1 for
  • Troubleshooting Trailer Disconnected Alert Alarm on 2018 Toyota Tundra
    There is an adapter to help with LED trailer lights that has the load resistors you are seeking. It is the Trailer Connector Adapter w/ Lamp-Out Sensor Bypass - 7-Way RV to 7-Way RV - Vehicle End # 20142. The issue when trailer disconnected alarm or alert comes on is normally specific to your electric brake controller output pin which is normally what senses a slight draw and communicates that the trailer is connected. The 5 o'clock pin on your 7-way is the brake controller output...
    view full answer...
    Image 1 for Image 2 for
  • Diagnosing Overload Warning, No Brakes, On a Tekonsha Prodigy P3 Brake Controller
    The overload warning you are seeing indicates that the P3, # 90195, detects an excessive current overload condition during operation. This means that there is most likely a short in the brake output wire. The P3 has diagnostic troubleshooting settings, see instructions link. Press the lower button on the right side of the controller, this is the Menu/Options button. Select the Help setting and press the menu button again. Now, select troubleshoot and press the menu button. Now, using the...
    view full answer...
  • Electric Trailer Brakes not Working
    There are a number of reasons why the brakes on your trailer may not be working. Lets start with the easiest things to check. First, check the vehicle and trailer connectors for corrosion. This can cause a short inside the connector and the brake feed circuit and ground are at the bottom of the connector so moisture affects these connections first. Next, check the ground wire on the vehicle and trailer connectors, trailer brake magnets and the brake controller itself. If there is a bad...
    view full answer...


< Previous
123. . .29


Do you have a question about this Electrical Tool?


Info for this part was:

Employee Jameson C
Expert Research:
Jameson C
Employee Kathleen M
Installed by:
Kathleen M
Employee Wilson B
Updated by:
Wilson B
Employee Matthew S
Written by:
Matthew S
Employee Daron K
Edited by:
Daron K

At etrailer.com we provide the best information available about the products we sell. We take the quality of our information seriously so that you can get the right part the first time. Let us know if anything is missing or if you have any questions.


Product Experts Available Now!
Call 1-800-940-8924
<